Step-by-Step Guide: Setting Up WordPress on an Ubuntu-based EC2 Instance
This guide will help you set up a WordPress site on an Ubuntu-based EC2 instance with a static IP (Elastic IP). The instructions are designed to be straightforward and easy to follow, ensuring that even beginners can successfully complete the setup.
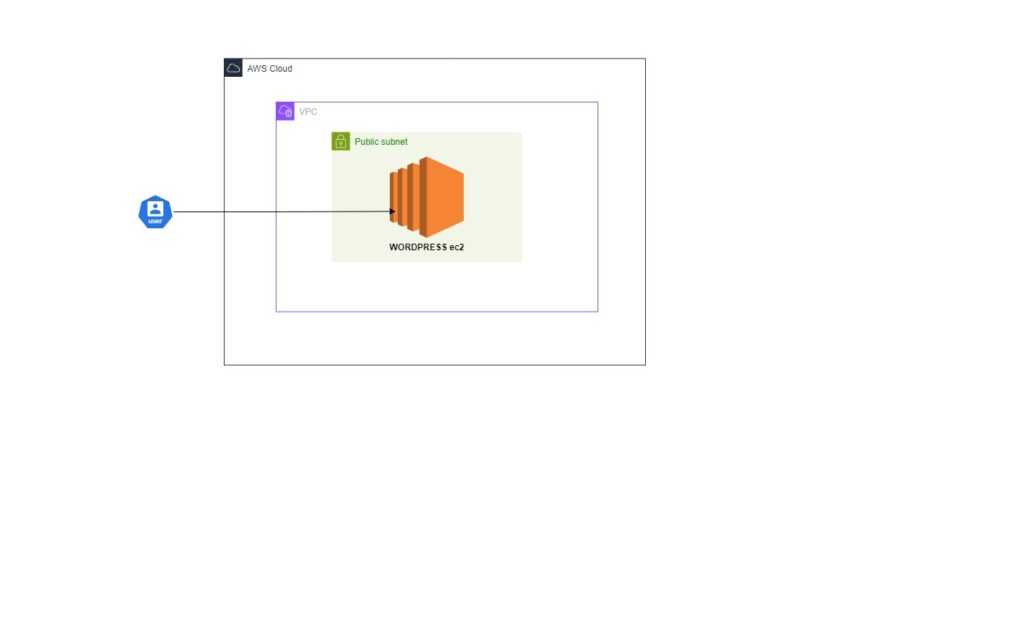
Provisions Required
To set up a WordPress site on an EC2 instance with a static IP and Ubuntu AMI, you will need the following resources:
VPC (Virtual Private Cloud):
A custom VPC for hosting your EC2 instance.
Example CIDR block: 10.0.0.0/16.
Subnet:
A public subnet within the VPC for the EC2 instance.
Example CIDR block: 10.0.1.0/24.
Internet Gateway:
Allows the EC2 instance to access the internet.
Route Table:
Routes traffic from the subnet to the internet via the Internet Gateway.
Elastic IP:
A static IP address to ensure the IP remains the same across restarts.
EC2 Instance:
An Ubuntu-based EC2 instance to host WordPress.
Security Group:
Allows necessary inbound traffic:
SSH (port 22)
HTTP (port 80)
HTTPS (port 443)
MySQL on EC2:
MySQL database installed on the same EC2 instance for simplicity.
Step 1: Create a VPC
Log in to AWS Management Console.
Navigate to the VPC Dashboard and click “Create VPC”.
Configure the VPC:
Name: WordPress-VPC.
IPv4 CIDR block: 10.0.0.0/16.
Tenancy: Default.
Click “Create VPC”.
Step 2: Create a Public Subnet
Go to the Subnets section in the VPC Dashboard.
Click “Create Subnet”.
Configure the Subnet:
Name: Public-Subnet.
Select VPC: WordPress-VPC.
IPv4 CIDR block: 10.0.1.0/24.
Click “Create Subnet”.
Make the Subnet Public:
Select the subnet you just created.
Click “Actions” > “Modify auto-assign IP settings”.
Enable “Auto-assign IPv4” and click “Save”.
Step 3: Set Up an Internet Gateway
Go to the Internet Gateways section in the VPC Dashboard.
Click “Create Internet Gateway”.
Attach the Internet Gateway:
Name: WordPress-IGW.
Click “Create Internet Gateway”.
Select the created Internet Gateway.
Click “Actions” > “Attach to VPC” > Select WordPress-VPC.
Step 4: Create a Route Table for the Public Subnet
Navigate to the Route Tables section in the VPC Dashboard.
Click “Create Route Table”.
Configure the Route Table:
Name: Public-Route-Table.
Select VPC: WordPress-VPC.
Click “Create Route Table”.
Add a Route to the Internet Gateway:
Select the created route table.
Go to “Routes” > “Edit routes”.
Add a route:
Destination: 0.0.0.0/0
Target: WordPress-IGW
Click “Save routes”.
Associate the Route Table with the Public Subnet:
Go to “Subnet Associations” > “Edit subnet associations”.
Select Public-Subnet and click “Save”.
Step 5: Allocate an Elastic IP
Go to the Elastic IPs section in the EC2 Dashboard.
Click “Allocate Elastic IP address”.
Allocate and Associate Elastic IP:
Allocate the Elastic IP.
Select the Elastic IP > “Actions” > “Associate Elastic IP address”.
Associate with the EC2 instance after it’s launched.
Step 6: Launch an EC2 Instance with Ubuntu
Navigate to the EC2 Dashboard and click “Launch Instance”.
Configure the EC2 Instance:
Name: WordPress-EC2.
AMI: Ubuntu Server 22.04 LTS.
Instance type: t2.micro (free tier eligible).
Key pair: Create or select an existing key pair.
Network settings:
VPC: WordPress-VPC.
Subnet: Public-Subnet.
Disable Auto-assign Public IP.
Security Group:
Allow inbound rules for SSH (port 22), HTTP (port 80), and HTTPS (port 443).
Storage: Use the default settings.
Click “Launch Instance”.
Associate the Elastic IP:
After launching, associate the Elastic IP with the EC2 instance.
Step 7: Connect to the Instance
Connect via SSH:
Once the instance is running, click “Connect”.
Follow the SSH connection instructions in your terminal.
Step 8: Install Apache, PHP, and MySQL
Update the System:
Run: sudo apt update && sudo apt upgrade -y
Install Apache:
Run: sudo apt install apache2 -y
Install PHP and MySQL Connector:
Run: sudo apt install php libapache2-mod-php php-mysql -y
Install MySQL Server:
Run: sudo apt install mysql-server -y
Step 9: Set Up the MySQL Database
Log in to MySQL:
Run: sudo mysql -u root
Change Authentication Plugin:
Run: ALTER USER ‘root’@’localhost’ IDENTIFIED WITH mysql_native_password BY ‘yourpassword’;
Create a Database and User for WordPress:
Run: CREATE DATABASE wordpress;
Run: CREATE USER ‘wordpressuser’@’localhost’ IDENTIFIED BY ‘yourpassword’;
Run: GRANT ALL PRIVILEGES ON wordpress.* TO ‘wordpressuser’@’localhost’;
Run: FLUSH PRIVILEGES;
Exit MySQL:
Run: EXIT;
Step 10: Download and Configure WordPress
Navigate to the /tmp Directory:
Run: cd /tmp
Download WordPress:
Run: wget https://wordpress.org/latest.tar.gz
Extract WordPress:
Run: tar -xvzf latest.tar.gz
Move Files to the Web Directory:
Run: sudo mv wordpress/* /var/www/html/
Remove the default Apache Ubuntu page:
Run: sudo rm -rf /var/www/html/index.html
Configure WordPress:
Create the wp-config.php file in the html directory:
Copy the sample configuration file:
Run: sudo cp /var/www/html/wp-config-sample.php /var/www/html/wp-config.php
Edit the wp-config.php file:
Run: sudo vim /var/www/html/wp-config.php
Update the database details:
define(‘DB_NAME’, ‘wordpress’);
define(‘DB_USER’, ‘wordpressuser’);
define(‘DB_PASSWORD’, ‘yourpassword’);
define(‘DB_HOST’, ‘localhost’);
Save and exit the editor.
Step 11: Finalize the Installation
Set Permissions:
Set ownership:
Run: sudo chown -R www-data:www-data /var/www/html/
Set permissions:
Run: sudo chmod -R 755 /var/www/html/
Restart Apache:
Run: sudo systemctl restart apache2
Access WordPress:
Open a web browser and navigate to the Elastic IP of your EC2 instance.
Complete the WordPress setup by following the on-screen instructions.
Link Your Domain Name to Your Website:
Go to your domain DNS settings (Namecheap, GoDaddy, Bluehost, etc.).
Create a new A Record, paste your IP address in the appropriate field, and save. This process may take a few minutes.
Serve the Website on the Apache Root Directory:
Run: cd /etc/apache2/sites-available/
Run : sudo vim 000-default.conf
Add your server name:
ServerName yourdomain.com
ServerAlias www.yourdomain.com
Configure the URL Name from WordPress:
Go to Settings > General in the WordPress dashboard and replace the WordPress Address (URL) and Site Address (URL) IP address with your website URL. Click “Save Changes”.
Add an SSL Certificate:
First, install Certbot:
Run: sudo apt install certbot python3-certbot-apache
Run: sudo certbot –apache
Enter your email address and follow the prompts.