Complete Setup Guide: Deploying a WordPress Application on AWS with EC2 and RDS
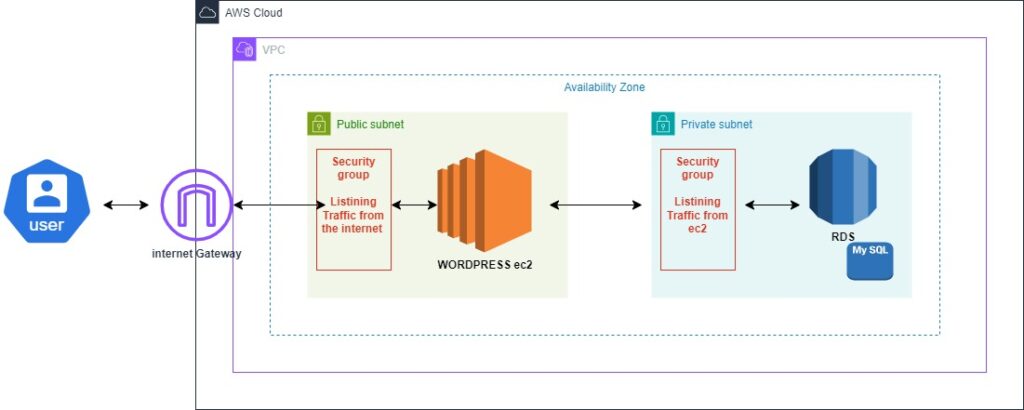
This guide will walk you through setting up an EC2 instance on a public subnet and an RDS MySQL database on a private subnet for hosting a WordPress application using AWS. We’ll start by creating the VPC and related resources, then proceed with setting up the Security group , RDS, EC2 instance, and WordPress.
1. Create VPC, Subnets, Internet Gateway, and Route Tables
AWS provides an option called “VPC and more” that allows you to create the entire network infrastructure in one step. This includes the VPC, subnets, Internet Gateway (IGW), and Route Tables (RT).
Use the “VPC and more” option in the AWS Management Console to create:
VPC: Your private cloud network.
Subnets: Public and private subnets for different resource groups.
Internet Gateway (IGW): Allows instances in the public subnet to communicate with the internet.
Route Tables: Defines how traffic is directed within the VPC.
The VPC with subnets, an IGW, and RTs will be fully set up, ready for resource deployment.

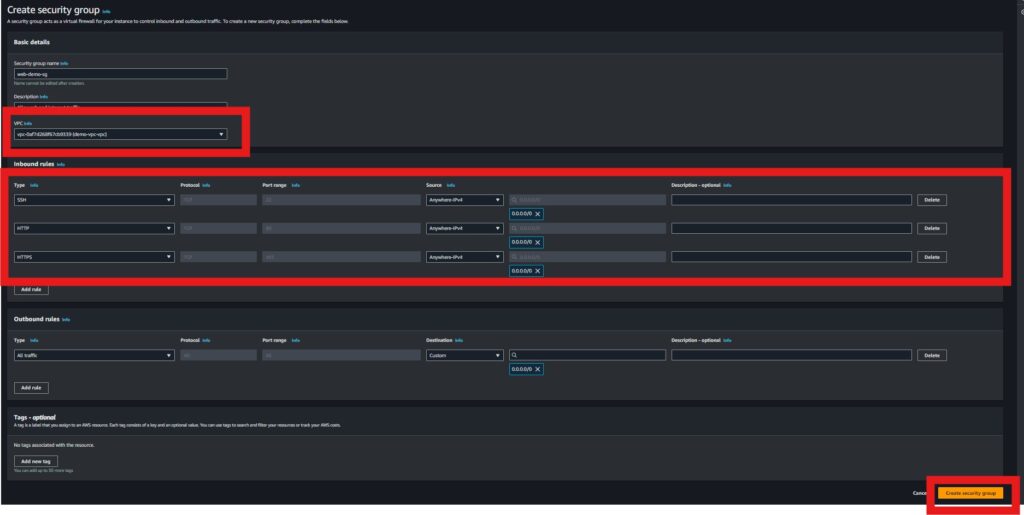
2. Create Security Groups
Security groups act as virtual firewalls that control inbound and outbound traffic to your EC2 and RDS instances.
Steps:
EC2 Security Group:
Allow inbound SSH (port 22) from your IP address.
Allow inbound HTTP (port 80) and HTTPS (port 443) traffic from the internet.
DB Security Group:
Allow inbound MySQL (port 3306) traffic only from the EC2 security group.
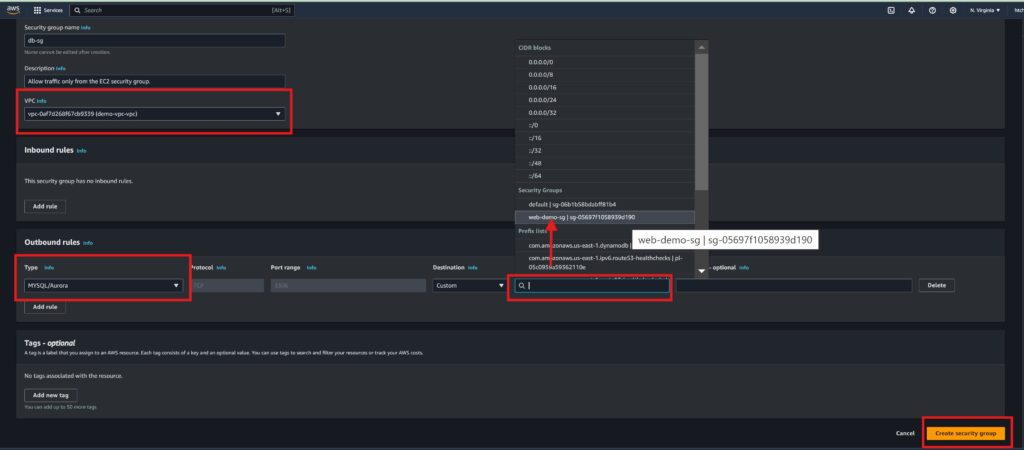
Your EC2 instance will be accessible from the internet, and the RDS instance will only be accessible from the EC2 instance.
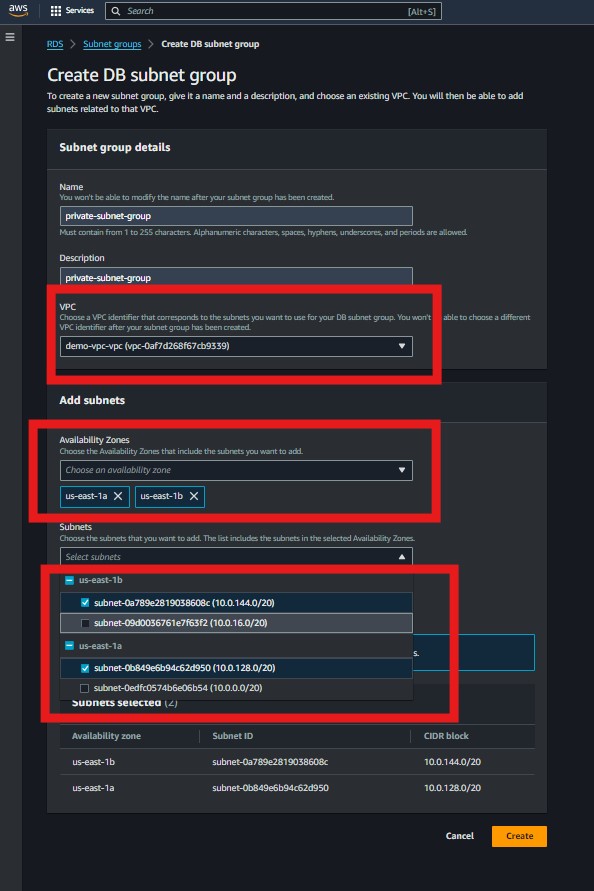
3. Create RDS Database
The RDS MySQL database will be deployed in the private subnet, ensuring it’s not directly exposed to the internet.
Create a DB Subnet Group and assign your private subnet(s) to it.
Engine: MySQL (select Free Tier if applicable).

DB Instance Identifier: A name for your database instance.
Master Username and Password: Credentials for administrative access.
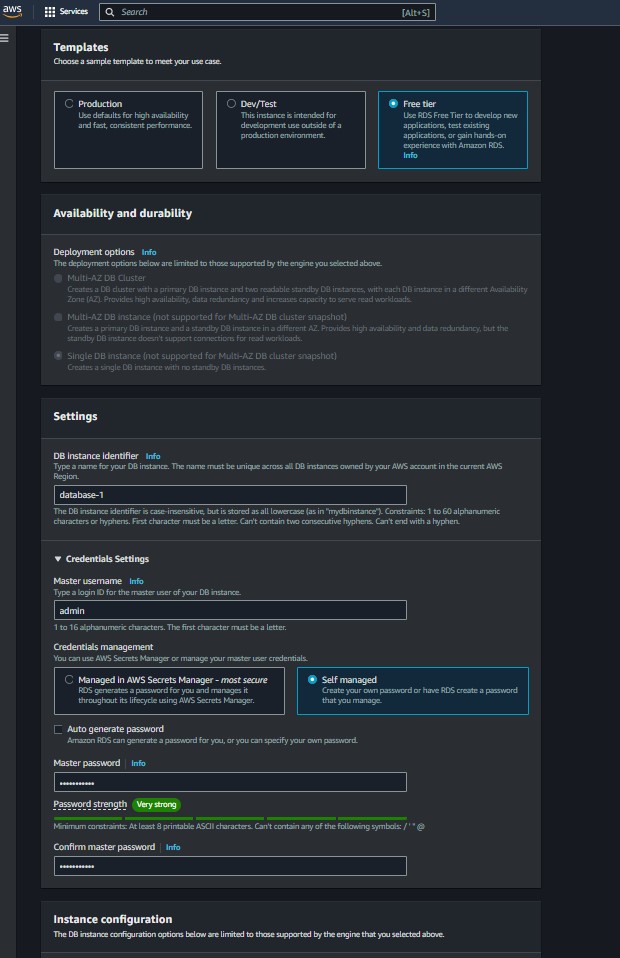
VPC: Select your newly created VPC.
Public Accessibility: Set to “No.”
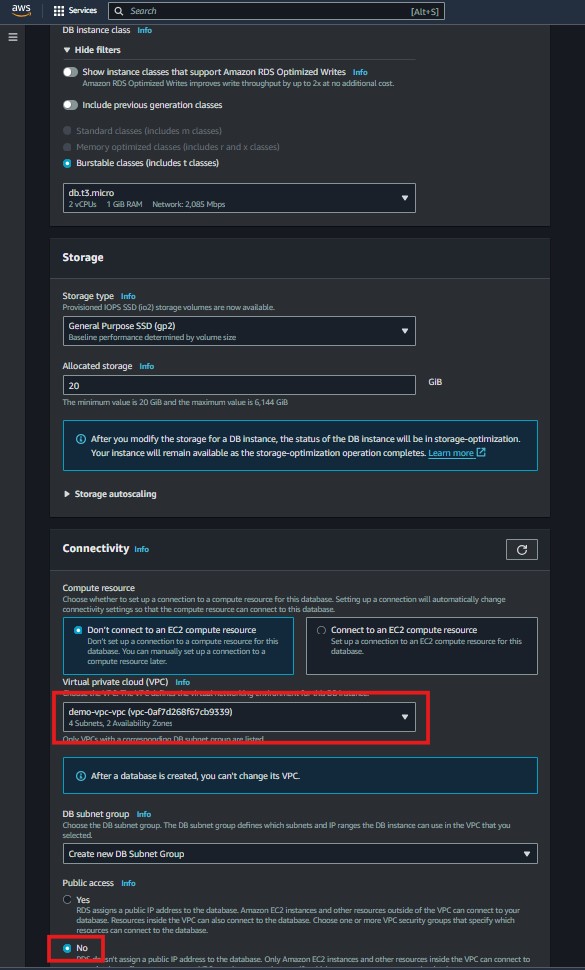
DB Subnet Group: Select the DB Subnet Group you created.
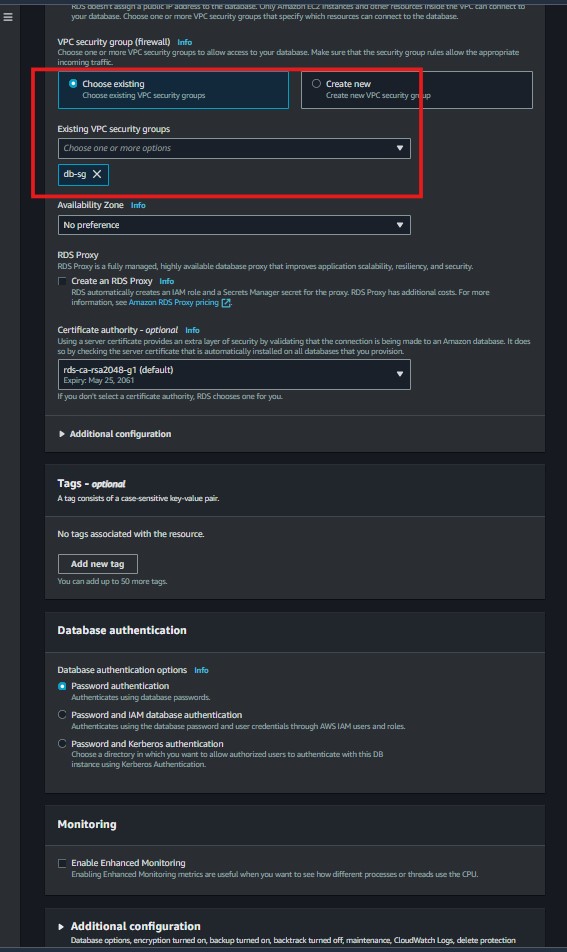
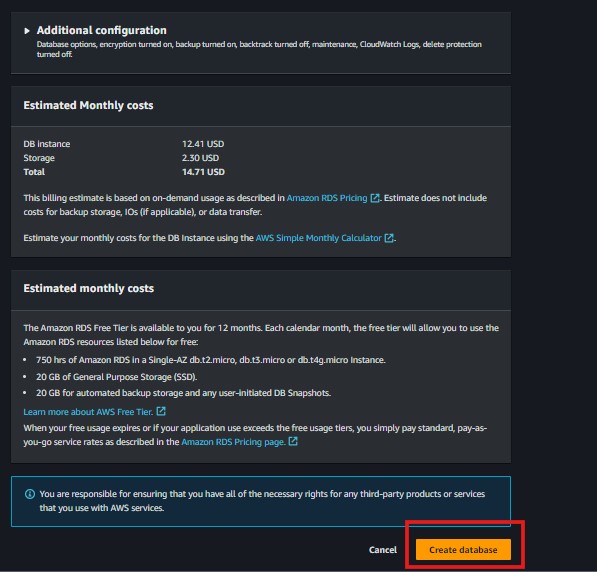
The RDS instance will be created within the private subnet, secured and ready to connect with your web server.
4. Create EC2 Instance
The EC2 instance will host the WordPress application and Apache web server.
Launch an EC2 instance with the following configuration:
AMI: Choose an Ubuntu AMI (or your preferred Linux distribution).
Instance Type: Select a type suitable for web hosting (e.g., t2.micro for Free Tier).
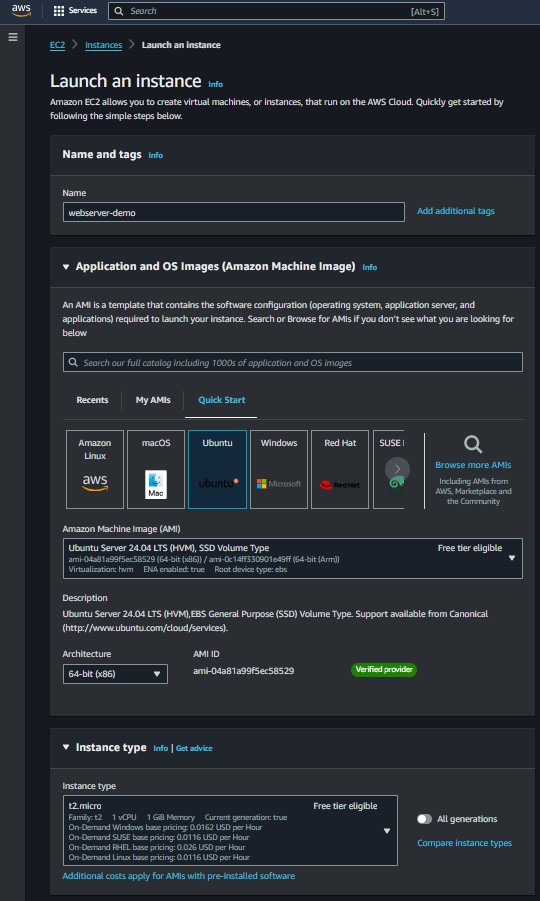
VPC: Select your newly created VPC. By default it will attached the configuration subnet.
Security Group: Attach the EC2 security group.
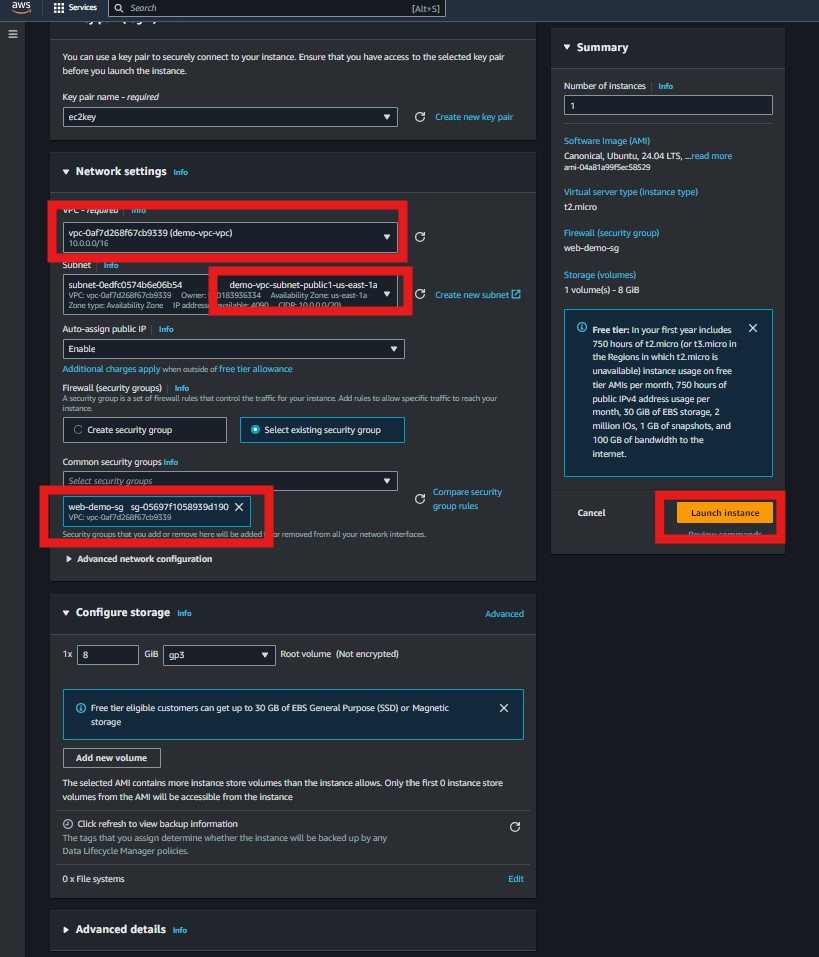
The EC2 instance will be accessible from the internet and able to communicate with the RDS instance.
5. Connect to the EC2 Instance via SSH
You will SSH into the EC2 instance to install necessary software and configure the server.
Command:
- ssh -i <your_key_pem> ubuntu@<your_ec2_public_ip>
6. Update and Install Dependencies
Ensure the server is up-to-date and has all the required packages for running a web server.
Commands:
- sudo apt update
- sudo apt install apache2 php libapache2-mod-php php-mysql wget unzip -y
Apache, PHP, and MySQL connectors will be installed and ready for WordPress.
7. Connect to RDS and Configure the Database
You need to set up a specific database and user for WordPress.
Commands:
- sudo mysql -h <your_rds_endpoint> -P 3306 -u <your_master_username> -p
- Enter your password “ This password would have been set when you created the RDS instance”
Once logged in:
- CREATE DATABASE wordpress;
- CREATE USER ‘wordpressuser’ IDENTIFIED BY ‘strongpassword’;
- GRANT ALL PRIVILEGES ON wordpress.* TO ‘wordpressuser’;
- FLUSH PRIVILEGES;
- EXIT;
The WordPress database and user will be ready to use.
8. Download and Configure WordPress
Download and set up WordPress to use the database you just configured.
Commands:
- cd /tmp
- wget https://wordpress.org/latest.tar.gz
- tar -xvzf latest.tar.gz
- sudo mv wordpress/* /var/www/html/
- sudo rm -rf /var/www/html/index.html # Remove the default Apache page
- sudo cp /var/www/html/wp-config-sample.php /var/www/html/wp-config.php
- sudo vim /var/www/html/wp-config.php
Edit the wp-config.php file:
- define(‘DB_NAME’, ‘wordpress’);
- define(‘DB_USER’, ‘wordpressuser’);
- define(‘DB_PASSWORD’, ‘strongpassword’);
- define(‘DB_HOST’, ‘<your_rds_endpoint>’);
WordPress will be configured and ready to serve as your web application.
9. Set Permissions and Restart Apache
Correct file permissions are critical for WordPress to operate smoothly.
Commands:
- sudo chown -R www-data:www-data /var/www/html/
- sudo chmod -R 755 /var/www/html/
- sudo systemctl restart apache2
Apache will be restarted, and WordPress will be properly configured to run.
10. Access WordPress
Explanation: Finalize your WordPress setup through the web interface.
Open a web browser and navigate to your EC2 instance’s public IP (or Elastic IP if assigned).
Follow the on-screen instructions to complete the WordPress setup.
You will have a fully functional WordPress site hosted on AWS.